Bringing Music to Life: The Art and Craft of 3D Layered Paper Cut Templates
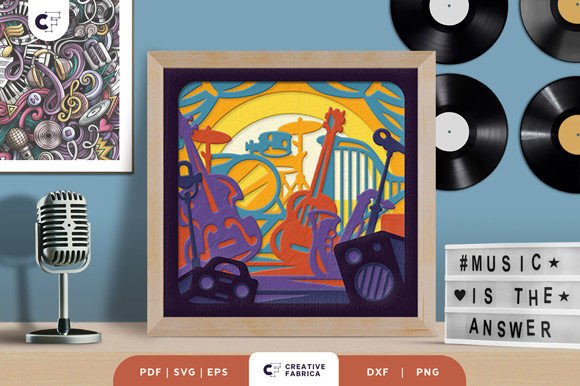
Hello, crafters! Welcome to the fascinating world where two-dimensional paper transforms into a three-dimensional masterpiece. Today, we are diving deep into the art of Musical Instruments 3D Layered Paper Cuts. If you have ever admired those intricate shadow boxes that seem to glow with depth and detail, you are looking at the result of layered paper crafting. This specific design, featuring a beautiful array of musical instruments, is not just a decoration; it is a celebration of sound, rhythm, and creativity captured in cardstock.
In this guide, we will explore everything you need to know about this unique project. From understanding the file formats included in your download to mastering the assembly process, we will walk through how to turn a digital template into a stunning physical object. Whether you are a seasoned papercutting expert or a beginner holding an art knife for the first time, this article will provide the context and confidence you need to succeed.
What is a 3D Layered Paper Cut?
At its core, a 3D layered paper cut is a technique that uses multiple sheets of paper, each cut with a slightly different design, stacked upon one another to create the illusion of depth. Unlike traditional silhouette cutting, which relies on a single flat shape, layered crafting utilizes negative space and varying depths to build a scene.
The Musical Instruments 3D Shadow Box template we are discussing today consists of 8 distinct layers. Each layer represents a slice of the final image. When viewed from the front, the human eye blends these separate slices into a cohesive, three-dimensional picture. The gaps between the layers—created by foam tape, glue dots, or spacers—allow light to travel through the piece, casting soft shadows that enhance the 3D effect. This technique is particularly effective for complex subjects like musical instruments, where the curves of a violin, the keys of a piano, or the bells of a trumpet benefit immensely from added dimension.
The Significance of Digital Templates in Modern Crafting
Gone are the days when artists had to draw every intricate curve by hand before cutting. Modern technology has democratized access to high-quality designs. When you purchase or download a template like this Musical Instruments set, you are receiving a suite of digital files designed for versatility. Understanding these formats is crucial for maximizing your crafting potential:
- SVG (Scalable Vector Graphics): This is the gold standard for electronic cutting machines. If you own a Silhouette Cameo, Cricut Explore, or similar device, the SVG file allows the machine to read the vector paths and cut the design with perfect precision. A key advantage of SVG is scalability; you can resize the design to fit different frames without losing image quality, provided you maintain the aspect ratio.
- PDF (Portable Document Format): Ideal for home printers. If you do not have a cutting machine, you can print the PDF layers directly onto your cardstock and cut them out manually. This format ensures that the layers align correctly when printed at 100% scale.
- EPS (Encapsulated PostScript): Often used by professional graphic designers using software like Adobe Illustrator. It offers similar vector benefits to SVG but is compatible with a broader range of professional design suites.
- PNG (Portable Network Graphics): These are raster images often used for preview purposes or for sublimation projects. While not ideal for cutting paths, they help you visualize the final color scheme.
- DXF (Drawing Exchange Format): Another vector format commonly supported by older or specific CAD-based cutting software.
Having access to all these formats ensures that no matter what tools you have in your craft room, you can bring this project to life.
Tools and Materials: Setting Up for Success
To achieve the crisp, clean lines necessary for a professional-looking shadow box, the choice of materials is paramount. The design specifications for this Musical Instruments template recommend a size of 20.32 × 20.32 cm (approximately 8x8 inches), which fits perfectly into standard square frames.
The Importance of Cardstock Weight
Not all paper is created equal. For 3D layering, you need paper that is sturdy enough to hold its shape without warping under the weight of the layers above it, yet thin enough to allow for clean cutting. The recommended material for this project is Encore Cardstock 80 lb cover (216 gsm). This weight provides the perfect balance: it is thick enough to create defined shadows between layers but not so thick that it becomes difficult to cut intricate details like guitar strings or flute keys. Using lighter paper may result in a flimsy final product, while heavier board might be impossible to cut cleanly without specialized industrial tools.
Cutting Methods: Machine vs. Hand
If you have a cutting machine, the process is streamlined. Simply load your 80 lb cardstock, import the SVG file, and let the machine do the work. However, if you do not have access to a Cricut or Silhouette, do not be discouraged. You can absolutely achieve beautiful results using an art knife (such as an X-Acto knife) and a self-healing cutting mat. Print the PDF templates, tape them lightly to your cardstock, and carefully cut along the lines. While this method requires more time and a steady hand, it connects you deeply with the artistic process and allows for organic adjustments.
Assembly: From Flat Sheets to a Shadow Box
Once your eight layers are cut, the real magic begins. Assembly is where the 2D shapes transform into a 3D object. Here is a logical approach to building your Musical Instruments shadow box:
- Preparation: Lay out all eight layers in order. Usually, the files are numbered or named sequentially (e.g., Layer 1 to Layer 8). Layer 1 is typically the background, and Layer 8 is the foreground frame.
- Spacing: To create the 3D effect, you must add height between the layers. You can use double-sided foam tape, corrugated cardboard strips, or specialized paper spacers. Apply these adhesives to the back of each layer, focusing on areas that will be hidden by the layer above.
- Alignment: Carefully stack the layers, ensuring that the registration marks (if provided) or the outer edges align perfectly. Even a millimeter of misalignment can throw off the entire perspective of the musical instruments.
- Securing: Once satisfied with the alignment, press the layers together firmly. Allow the adhesive to set completely before moving the piece.
Lighting Options: Wall Art vs. Light Box
One of the most exciting aspects of layered paper cutting is its interaction with light. You have two primary options for displaying your finished Musical Instruments piece:
1. Framed Wall Decoration:
Place your assembled layers into a deep-set shadow box frame. Hang it on a wall where ambient room light can hit it from an angle. The natural shadows cast by the layers will give the instruments a floating appearance, adding texture and warmth to your music room, living room, or studio.
2. Illuminated Light Box:
For a truly dramatic effect, convert your project into a light box. By inserting LED strips or a flat LED panel between the back of the frame and the first layer of paper, you illuminate the design from behind. The light filters through the cut-out sections of the musical instruments, creating a glowing, ethereal look. This is particularly striking for evening displays or as a nightlight for a child who loves music. Note: When using LEDs, ensure they do not generate excessive heat, which could warp the paper over time.
Common Misunderstandings and Tips for Perfection
As you embark on this project, keep a few common pitfalls in mind to ensure the best results. First, remember that color variation is normal. The images you see in product previews are digital renderings. The actual final product color may vary slightly depending on your monitor settings, the lighting in your room, and the specific dye lot of the cardstock you purchase. Embrace these subtle differences as part of the handmade charm.
Secondly, regarding resizing: While SVG files are scalable, it is vital to maintain the aspect ratio. Stretching the image horizontally or vertically will distort the musical instruments, making a guitar look unnaturally wide or a drum too tall. Always lock the proportions when resizing in your design software.
Finally, consider the purpose of your gift. This project makes a thoughtful present for musicians, music teachers, or anyone who appreciates the intersection of art and sound. The effort involved in cutting and assembling eight layers shows a level of care that store-bought decorations simply cannot match.
Conclusion: Celebrating Creativity Through Layers
The Musical Instruments 3D Layered Paper Cut is more than just a craft project; it is an exploration of depth, light, and form. By utilizing modern digital templates alongside traditional crafting techniques, you can create a piece of art that honors the beauty of music in a tangible way. Whether you choose to display it as a sunlit wall hanging or a glowing beacon of creativity, the result is a testament to your skill and patience.
So, gather your cardstock, fire up your cutting machine or sharpen your art knife, and start layering. The world of 3D paper crafting awaits, and there is no better song to play than the one you create with your own hands.
Ready to start your project? Ensure you have the right materials by visiting the 12×12 Cardstock Shop to find the recommended Encore Cardstock. (Note: This is a paid link at no extra cost to you, supporting our ability to bring you more crafting guides).