Elevating Your Gifting Game with the Victorian Treat Cone
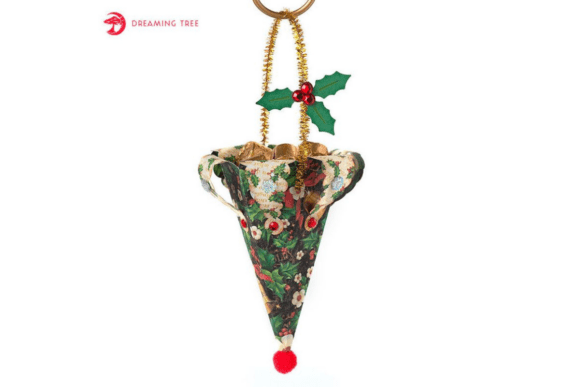
There is a distinct satisfaction in handing over a gift that feels handmade yet polished, and few projects achieve this balance quite like the Victorian Treat Cone. Designed by Dreaming Tree, this paper craft project brings vintage elegance to weddings, tea parties, bridal showers, and holiday gatherings. It is more than just a container; it is an ornate vessel for candies, potpourri, or small trinkets that adds a touch of charm and sophistication to any occasion. However, while the end result is undeniably beautiful, the journey from digital file to finished favor often trips up even experienced crafters. Understanding the nuances of this specific design can save you time, materials, and frustration.
Choosing the Right Materials for Structural Integrity
One of the most common pitfalls when assembling the Victorian Treat Cone is underestimating the importance of paper weight. The design instructions recommend Encore Cardstock 80 lb cover (216 gsm), and for good reason. Many crafters, especially those looking to cut costs or use up scraps, might reach for standard 65 lb cardstock or even heavy patterned paper. While these lighter options may cut cleanly, they often lack the rigidity required to hold the cone's shape, particularly when filled with treats.
If you opt for paper that is too light, the cone may bow outward or collapse at the seams, ruining the elegant silhouette. Conversely, using paper that is too thick can make the intricate folding lines difficult to crease sharply, leading to a bulky appearance. The sweet spot is indeed around 80 lb cover. If you are using patterned paper like the suggested Graphic 45 sheets, ensure they are mounted on or paired with a sturdy base. For the solid color components, such as the Darice Core Couture Red Carpet or the Evergreen and Spinach Cardstock, sticking to the recommended weight ensures the layers sit flush against each other without warping.
Navigating SVG Compatibility and Sizing
Another area where confusion often arises involves the digital file itself. You will receive the Victorian Treat Cone design in SVG format only, accompanied by a PDF legend. A frequent mistake is assuming that SVG files behave identically across all software platforms. While the file is fully compatible with SVG-ready cutting machines, the way different programs interpret dimensions can vary slightly. The original design is optimized for 12×12 cutting mats, with final dimensions of approximately 5.5″H x 4.5″W x 4.5″D.
Many users attempt to resize the project significantly to fit smaller favors or larger centerpieces without adjusting their material expectations. If you scale the design down too much, the delicate details may become impossible to weed or fold. If you scale it up too large without switching to a heavier board, the structure will fail. Before sending your design to the cutter, always check the preview in your specific software. Use the PDF legend not just to identify pieces, but to map out your color strategy beforehand. This prevents the error of cutting all pieces only to realize two contrasting layers were cut from the same color sheet, diminishing the visual depth of the final product.
Assembly Precision and Adhesive Selection
The assembly process is where the magic happens, but it is also where patience is most tested. The design includes intricate layers that require precise alignment. A common oversight is rushing the gluing process or using the wrong type of adhesive. The supply list calls for both Hot Glue and standard Glue, and distinguishing between their uses is critical for a professional finish.
Hot glue sets quickly and provides strong initial tack, which is excellent for holding the main cone structure and attaching heavier embellishments like the 0.5" diameter pompom. However, applying too much hot glue can cause it to seep through the paper or create unsightly bumps under the top layers. For the finer, overlapping decorative strips, a high-quality liquid glue or a precision glue pen allows you to spread a thinner, more even layer that dries clear. This prevents the "lumpy" look that can detract from the vintage aesthetic.
Furthermore, do not overlook the role of the pipe cleaner and rhinestones. These are not merely afterthoughts; they are structural and aesthetic anchors. The pipe cleaner often helps secure the top closure or acts as a handle mechanism. If you skip securing it properly with adequate glue, the entire top assembly can detach when a guest lifts the cone. Similarly, placing rhinestones haphazardly can make the project look cluttered rather than ornate. Follow the visual cues in the step-by-step video tutorial included with the purchase. Watching the technique for folding the score lines before gluing is particularly helpful; pre-folding ensures crisp edges and makes the 3D assembly much more intuitive.
Maximizing Efficiency for Small Business Owners
For entrepreneurs and small business owners creating favors in bulk, efficiency is key. A major mistake is cutting and assembling one cone at a time. Instead, adopt a production-line approach. Cut all your green cardstock bases first, then all your red accents, and finally all your patterned layers. Organize your kits by color sets before you begin folding. This method reduces the mental load of switching between tasks and minimizes the chance of missing a piece.
Additionally, consider the filling process. It is tempting to fill the cones immediately after assembly, but if the glue is not fully cured, the weight of the candies or potpourri can push the seams apart. Allow your assembled cones to rest for at least an hour before filling them. If you are using heavy items like chocolates, consider adding a small inner liner made of cellophane or tissue paper to provide extra support and protect the paper from oils.
Final Thoughts on Crafting Success
The Victorian Treat Cone is a timeless piece for any paper crafter's collection, offering a blend of historical charm and modern convenience. By paying attention to paper weight, respecting the limitations of digital scaling, choosing the right adhesives, and organizing your workflow, you can avoid the common frustrations that plague DIY projects. Whether you are a beginner looking to impress at a family gathering or a professional aiming to elevate your client's event favors, taking these corrective steps ensures your final product exudes the quality and sophistication intended by the designer. Remember, the goal is not just to finish the project, but to create a memorable favor that your guests will adore long after the event has ended.