Crafting Memories with the School House Gift Box
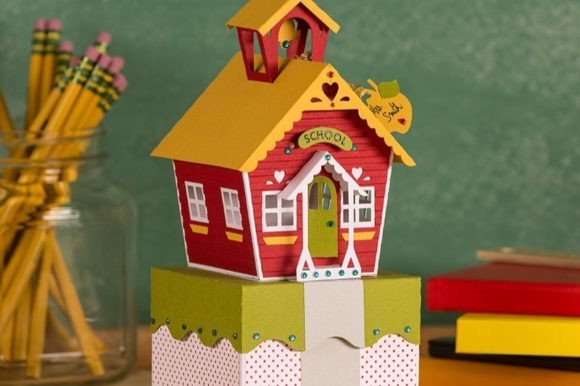
There is something undeniably nostalgic about the image of a classic red schoolhouse. It evokes memories of crisp autumn mornings, the sound of a bell ringing, and the excitement of learning. When you bring that imagery into the world of paper crafting, specifically with the School House Gift Box, you aren't just making a container; you are creating a tangible piece of appreciation that speaks volumes before it is even opened. This charming 3D paper project transforms standard cardstock into a miniature architectural marvel, complete with a bell tower, layered windows, and those quintessential decorative accents that make it feel authentic.
For adults who love to get their hands dirty with glue and scissors, this project offers a perfect blend of creativity and utility. Unlike a simple gift bag or a generic box, this design requires a bit of assembly that results in a high-impact visual reward. The structure stands at an impressive 9 inches tall when fully assembled, with a sturdy base of 3 3/4 inches, making it substantial enough to hold more than just a few candies. It is designed to be a centerpiece of gratitude, whether sitting on a teacher's desk or serving as a unique party favor.
Beyond Teacher Appreciation: Versatile Uses for Your Creation
While the immediate association with a schoolhouse design is naturally teacher appreciation, limiting this project to just the end of the school year would be a missed opportunity. The School House Gift Box is incredibly versatile and can fit into various scenarios throughout the year.
Consider the back-to-school rush in late summer. Parents often struggle to find gifts that feel personal rather than mass-produced. Filling this box with high-quality pens, a gift card to a local coffee shop, and a handwritten note creates a welcome gesture that helps build a positive relationship with educators right from day one. The box itself becomes part of the decor, perhaps holding pencils or storing small classroom supplies long after the treats are gone.
However, think broader than just the classroom. This design is perfect for educational nonprofits or community centers hosting fundraising galas. Imagine a table lined with these boxes as donor thank-you gifts, filled with locally sourced chocolates or branded merchandise. The academic aesthetic aligns perfectly with missions focused on literacy, tutoring, or youth development. It signals support for education in a way that a standard logo mug simply cannot.
For those involved in homeschooling co-ops, these boxes serve as delightful celebration markers. When a child completes a significant milestone or finishes a curriculum, presenting their achievement certificate inside a handcrafted schoolhouse adds a layer of ceremony to the occasion. It turns a piece of paper into an event.
Tailoring the Experience for Different Audiences
The beauty of working with SVG cut files lies in the customization. Depending on who the recipient is, you can alter the color palette and contents to shift the tone entirely.
- For the Traditionalist: Stick to the classic red (Rouge) exterior with white trim and a mustard yellow bell. Fill it with vintage-style items like wax-sealed notes or old-fashioned hard candies.
- For the Modern Educator: Swap the traditional red for a sleek stone gray or a soft leaf green. Use patterned paper for the roof to add a contemporary twist. Inside, place tech accessories like USB drives, stylus pens, or artisanal tea blends.
- For Classroom Parties: Scale the concept down by filling multiple boxes with individual treats for students. While the main design is sized for a substantial gift, the aesthetic can inspire smaller versions for student goodie bags during holiday parties or field day events.
Industries beyond education can also leverage this design. Real estate agents specializing in family homes often give closing gifts to new parents. A School House Gift Box filled with information about local school districts, library cards, and neighborhood maps is a thoughtful, hyper-local touch that shows the agent understands the family's priorities.
Practical Considerations Before You Cut
Before diving into your cutting machine, there are a few practical realities to consider to ensure your project goes smoothly. First and foremost is the material selection. This design relies on structure to maintain its 3D form. Using lightweight paper will result in a floppy box that loses its architectural integrity. The recommendation is to use 80 lb cover (216 gsm) cardstock, such as Encore Cardstock. This weight provides the necessary rigidity for the walls and the bell tower to stand tall without buckling under the weight of the contents.
You will need to gather a specific supply list to match the design's requirements. Typically, this involves two sheets of 12x12 white cardstock for the structural elements and trim, along with accent colors like leaf green, rouge, mustard, and stone. You will also need an 8.5x11 sheet of pattern paper for added visual interest. Don't forget the embellishments; rhinestones, faux pearl stickers, and zots (double-sided adhesive dots) are essential for adding those finishing touches that elevate the craft from "homemade" to "hand-crafted."
Another critical factor is your cutting machine compatibility. This project is delivered in SVG format, which is universally compatible with major software and machines designed for 12x12 mats. However, keep in mind that while you can resize the project to fit your specific needs, doing so will alter the final dimensions. If you need the box to fit a specific item, such as a particular brand of wine bottle or a set of mugs, test the dimensions digitally before committing to the cut. The original design stands 9 inches high, which is quite tall, so ensure you have the vertical space on your mat and the physical space to assemble it comfortably.
Navigating the Assembly Process
One of the common concerns with 3D paper projects is the complexity of assembly. With numerous tabs, layers, and small details like the bell tower, it can feel daunting. However, the inclusion of a PDF legend is a game-changer. This guide helps you identify pieces quickly, allowing you to sort your cut files by color and function before you apply a drop of glue.
For those who are visual learners or simply want to avoid frustration, relying on the provided step-by-step video tutorial is highly recommended. Watching how the layers interlock and where the adhesive should be placed can save you from making irreversible mistakes. The process is meditative rather than stressful when you have the right guidance. It allows you to focus on the precision of the folds and the neatness of the seams, resulting in a professional-looking finish.
It is also worth noting the time investment. This is not a five-minute craft. Between sorting papers, weeding excess material, folding score lines, and gluing tabs, you should set aside a dedicated block of time. This makes it an excellent activity for a quiet evening or a weekend crafting session with friends. The result is a durable keepsake that recipients often hesitate to throw away, unlike disposable wrapping paper.
Ultimately, the School House Gift Box is more than just a trend; it is a tool for connection. In a digital age where notes are often texts and gifts are frequently e-gift cards, the effort required to cut, fold, and assemble a physical object carries significant emotional weight. It tells the recipient that they were worth the time and effort. Whether honoring a veteran teacher, celebrating a graduation, or welcoming a new family to the neighborhood, this project bridges the gap between a simple gesture and a memorable experience.